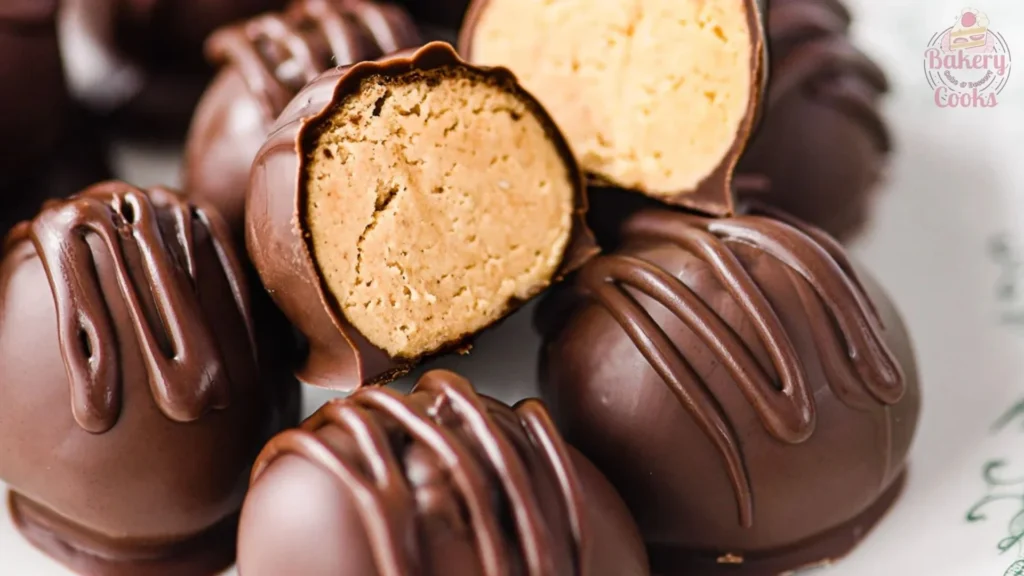
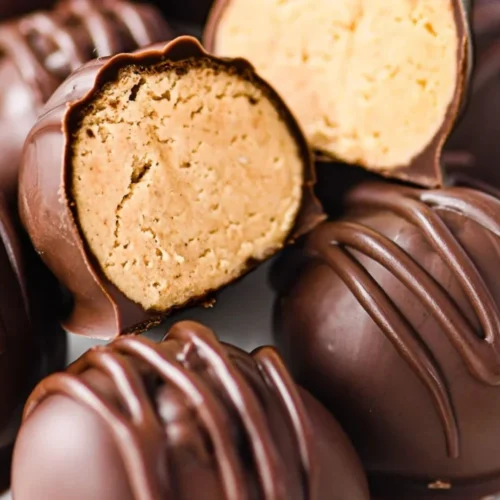
I made peanut butter cake balls because I was inspired by a video showing how they are made. Peanut butter cake balls are small, round treats made by mixing crumbled cake with peanut butter and cream cheese, and then coating them in chocolate.
The special feature of these cake balls is the creamy peanut butter center combined with the rich chocolate coating.
They offer a delightful combination of flavors in every bite. Now, I will guide through the step-by-step process to make these delicious peanut butter cake balls from start to finish.
Why We Love This Recipe
This recipe is a loved because it mixes soft cake with creamy peanut butter, creating a tasty and smooth inside. The chocolate coating adds a nice snap that makes each bite enjoyable.
It uses simple ingredients and is easy to make, so anyone can try it. The flavor is well balanced, not too sweet, and very satisfying.
These small treats are great for sharing or a quick snack. The combination of flavors and textures makes it a treat that feels special without needing a lot of time or effort.
How To Prepare Peanut Butter Cake Balls?
Recipe Details
Prep Time: 20 minutes (plus cooling time)
Cooking Time: 35 minutes (for baking cake)
Total Time: About 2 hours (includes chilling time)
Course: Dessert / Snack
Difficulty: Easy
Cuisine: American
Yield: Approximately 30 cake balls
Kitchen Utensils
- Mixing bowls
- Hand mixer or stand mixer
- Baking pan
- Parchment paper
- Fork or dipping tool
- Microwave-safe bowl
- Cooling rack or tray
- Refrigerator or freezer
Ingredients
- 1 box yellow or chocolate cake mix
(plus required ingredients per box – usually eggs, oil, and water) - 1 cup creamy peanut butter
- ¾ cup cream cheese, softened
- 2 cups semi-sweet or milk chocolate chips (for coating)
- 1 tablespoon coconut oil or shortening (to smooth melted chocolate)
- Optional toppings: Sprinkles, sea salt, or chopped peanuts
How To Make Peanut Butter Cake Balls
To make sure your peanut butter cake balls turn out amazing, let’s walk through every step carefully! I’ll explain everything in detail and share helpful tips along the way.
I’ll also mention the kitchen tools that make the process smoother though you don’t need every single one to succeed.
Use what you have on hand, and you’ll still end up with tasty, perfect peanut butter cake balls. Little tricks like chilling the mixture well and adding a bit of coconut oil to the chocolate will really improve the texture and coating.
Instructions
Step 1: Bake the Cake
Follow the instructions on the cake mix box, combining it with eggs, oil, and water as directed. Pour the batter into a baking pan and bake until done. Allow the cake to cool completely before moving on.
Step 2: Prepare the Filling
Once the cake has cooled, crumble it into fine pieces in a large bowl. Add creamy peanut butter and softened cream cheese. Stir everything together until the mixture forms a thick, dough-like texture.
Step 3: Shape the Cake Balls
Using a spoon or small scoop, roll the mixture into balls about 1 to 1.5 inches in diameter. Arrange them on a tray lined with parchment paper. Chill in the fridge or freezer for at least an hour to help them firm up.
Step 4: Dip in Chocolate
Melt chocolate chips with a bit of coconut oil or shortening in the microwave, heating in short bursts and stirring until smooth. Dip each chilled cake ball into the melted chocolate, covering it completely. Let any extra chocolate drip off before placing the coated ball back on the tray.
Step 5: Finish and Let Set
While the chocolate is still wet, add optional toppings like sprinkles, sea salt or chopped nuts. Let the cake balls set at room temperature or in the fridge until the chocolate coating is fully hardened.
Nutrition Facts Of Peanut Butter Cake Balls
| Nutrition | Amounts |
|---|---|
| Calories | 180 |
| Protein | 3g |
| Carbohydrates | 18g |
| Sugars | 13g |
| Fat | 11g |
| Saturated Fat | 4g |
| Sodium | 120mg |
Why My Recipe Works
My recipe works because the ingredients blend perfectly to create a balanced taste and texture. The cake crumbs absorb the peanut butter and cream cheese, making the filling moist but firm enough to shape.
Chilling the mixture helps it hold together, so the balls don’t fall apart when dipped in chocolate. Adding a bit of coconut oil to the chocolate helps it melt smoothly and coat evenly.
These small details make sure every bite is creamy inside and crisp outside. The process is straightforward, so the final result is both delicious and easy to make.
How To Serve And Decorating
To serve, place the peanut butter cake balls on a pretty plate or in a decorative box if giving as a gift. They can be enjoyed chilled or at room temperature, depending on your preference.
For decorating, sprinkle toppings like chopped peanuts, sea salt or colorful sprinkles on the chocolate coating while it’s still wet.
This adds extra texture and visual appeal. You can also drizzle a bit of melted white or dark chocolate over the top for a fancy touch. Let the decorations set before serving to keep everything neat and tasty.
Expert Tips
1. Make sure the cake is completely cool before crumbling it. Warm cake can make the mixture too soft and hard to handle.
2. After shaping the cake balls, chill them in the fridge or freezer for at least an hour. This helps them stay firm and makes dipping in chocolate much easier.
3. Beat the peanut butter and cream cheese together well until the mixture is smooth and creamy. This ensures the cake balls hold their shape and don’t crumble.
4. When melting the chocolate, add coconut oil or shortening to give the coating a glossy finish and prevent it from hardening too quickly or cracking.
5. Dip the cake balls quickly into the chocolate and gently tap off excess to get a smooth, even layer without breaks.
6. Keep the cake balls stored in an airtight container in the refrigerator to maintain their freshness and prevent the chocolate coating from sweating or melting.
Additions And Variations
Here are some additions and variations to try with peanut butter cake balls:
➤ Add chopped nuts like peanuts or almonds inside the mixture for extra crunch.
➤ Mix in mini chocolate chips for bursts of chocolate throughout.
➤ Use white chocolate or dark chocolate instead of milk chocolate for coating.
➤ Roll the finished cake balls in crushed cookies, sprinkles, or cocoa powder for different textures.
➤ Swap peanut butter for almond butter or Nutella to change the flavor profile.
➤ Add a dash of cinnamon or a splash of vanilla extract to the cake mixture for added depth.
How To Store The Finished Cake
To store the finished peanut butter cake balls, place them in an airtight container. Keep the container in the refrigerator to maintain freshness and prevent the chocolate coating from melting.
They will stay good for up to one week when refrigerated. If you want to store them longer, you can freeze the cake balls for up to three months.
Just thaw them in the fridge before serving. This way, they stay delicious and ready to enjoy anytime.
More Cake Recipes You’ll Love
Vanilla Cake Mix With Pudding – Extra Softness
Lemon Curd Cake Recipe [Mascarpone Frosting]
Classic Ina Garten Carrot Cake Recipe
Banana Bread Flax Seed Recipe – Healthy & Delicious
Strawberry Cheesecake Cake Recipe – Near Me
FAQs For Peanut Butter Cake Balls
Can I use homemade cake instead of boxed cake mix?
Yes, homemade cake can be used instead of boxed mix. Just make sure the cake is fully cooled before crumbling it. Using homemade cake allows you to customize flavors or make it from scratch, which can add a richer taste and better texture to your cake balls.
How can I prevent the chocolate coating from cracking after it hardens?
To keep the chocolate coating smooth and prevent cracking, add about 1 tablespoon of coconut oil or shortening to the melted chocolate. This makes the coating more flexible and less likely to crack when the cake balls are handled or stored.
Is it possible to freeze peanut butter cake balls, and how should I do it?
Yes, peanut butter cake balls freeze very well. Place them in a single layer on a baking sheet to freeze individually for about an hour, then transfer them to an airtight container or freezer bag. When ready to eat, thaw them in the refrigerator for a few hours or overnight for the best texture.
What can I use if I don’t have cream cheese on hand?
If cream cheese is unavailable, mascarpone cheese or a thicker, smooth peanut butter can sometimes be substituted. However, cream cheese helps create the perfect moist and firm texture, so substitutes might slightly change the consistency or flavor.
Are peanut butter cake balls gluten-free?
They can be gluten-free if you use a gluten-free cake mix and ensure all other ingredients, like chocolate chips and peanut butter, are also gluten-free. Always check labels carefully to avoid any gluten contamination.
Conclusion
This peanut butter cake balls recipe is simple to make and incredibly delicious. The combination of creamy peanut butter, soft cake, and smooth chocolate creates a treat that everyone will love.
I hope you give this recipe a try soon and enjoy the wonderful flavors as much as I did. After you make them, please share how delicious they turned out I would love to hear your thoughts and feedback!
Peanut Butter Cake Balls
Equipment
- Mixing bowls
- Hand mixer or stand mixer
- Baking Pan,
- Parchment paper
- Fork or dipping tool
- Microwave-safe bowl
- Cooling rack or tray
- Refrigerator or freezer
Ingredients
- 1 box yellow or chocolate cake mix
- plus required ingredients per box – usually eggs, oil, and water
- 1 cup creamy peanut butter
- ¾ cup cream cheese softened
- 2 cups semi-sweet or milk chocolate chips for coating
- 1 tablespoon coconut oil or shortening to smooth melted chocolate
- Optional toppings: Sprinkles sea salt, or chopped peanuts
Instructions
Step 1: Bake the Cake
- Follow the instructions on the cake mix box, combining it with eggs, oil, and water as directed. Pour the batter into a baking pan and bake until done. Allow the cake to cool completely before moving on.
Step 2: Prepare the Filling
- Once the cake has cooled, crumble it into fine pieces in a large bowl. Add creamy peanut butter and softened cream cheese. Stir everything together until the mixture forms a thick, dough-like texture.
Step 3: Shape the Cake Balls
- Using a spoon or small scoop, roll the mixture into balls about 1 to 1.5 inches in diameter. Arrange them on a tray lined with parchment paper. Chill in the fridge or freezer for at least an hour to help them firm up.
Step 4: Dip in Chocolate
- Melt chocolate chips with a bit of coconut oil or shortening in the microwave, heating in short bursts and stirring until smooth. Dip each chilled cake ball into the melted chocolate, covering it completely. Let any extra chocolate drip off before placing the coated ball back on the tray.
Step 5: Finish and Let Set
- While the chocolate is still wet, add optional toppings like sprinkles, sea salt or chopped nuts. Let the cake balls set at room temperature or in the fridge until the chocolate coating is fully hardened.